Using Knowledge
How to Create an Enterprise Space and Knowledge Base?
In Knowledge, you can create both Enterprise Spaces and Knowledge Bases. Before proceeding with the instructions, please understand the following concepts:
- In My Space, you cannot create additional spaces, only Knowledge Bases can be created. There is a built-in Default Knowledge Base.
- Under Enterprise Space, you can create different Spaces. Only within these created spaces can you then create Knowledge Bases.
The table below compares "My Space" and "Enterprise Space" in terms of creating spaces and knowledge bases:
| My Space | Enterprise Space | |
|---|---|---|
| Space | ✅ | |
| Knowledge Base | ✅ | ✅ |
| Folder | ✅ | ✅ |
How to Create an Enterprise Space?
After understanding the above concepts, you can officially start creating an Enterprise Space.
💡 Tip: Creating an enterprise space requires the relevant space creation permissions. Please ensure you have this permission before proceeding.
Steps to Create an Enterprise Space:
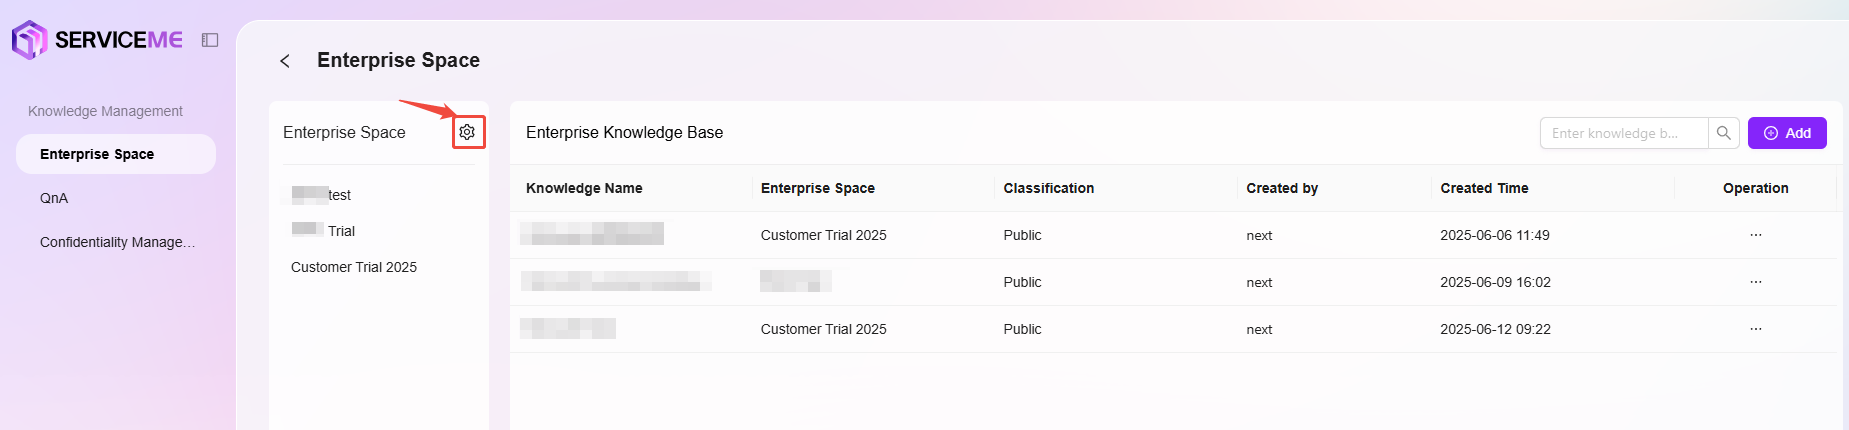
- First, navigate to "Settings -> Knowledge Management -> Enterprise Space", and click the "⚙️" next to Enterprise Space.
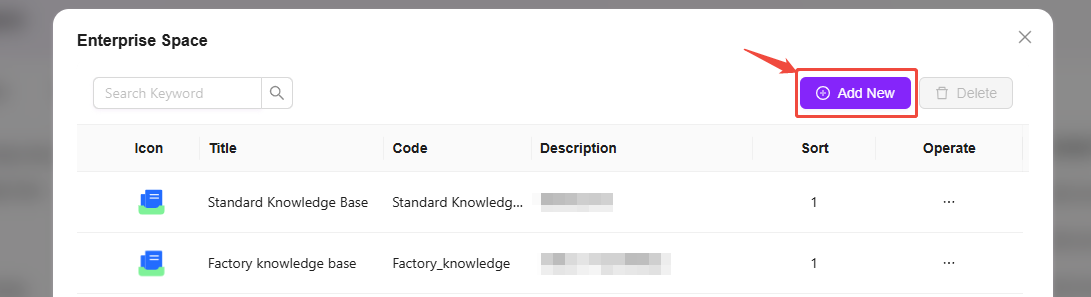
- In the pop-up Enterprise Space page, click "Add".
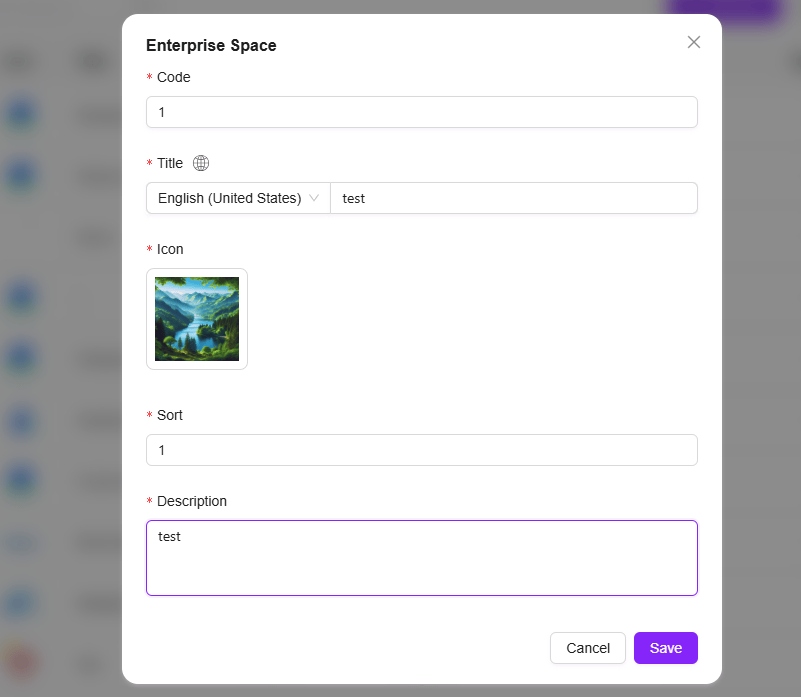
- Enter the code, name, icon, description, sorting and other information for the enterprise space, then click "Save" to successfully create the enterprise space (the example in the image is "Test Enterprise Space Creation").
How to Create a Knowledge Base?
💡 Tip: No special permissions are required to create a knowledge base in Personal Space.
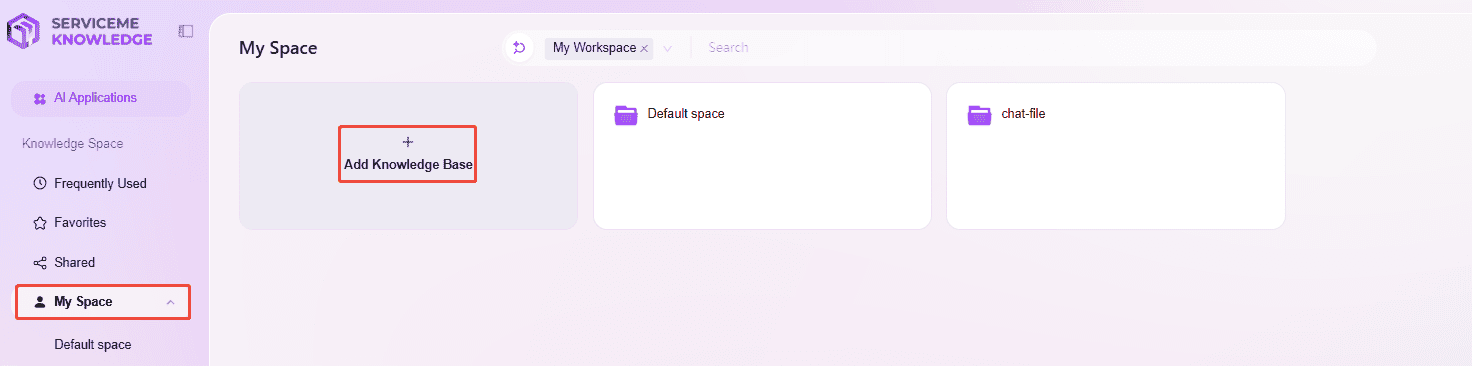
Creating a Knowledge Base in My Space
Steps to create a knowledge base in My Space:
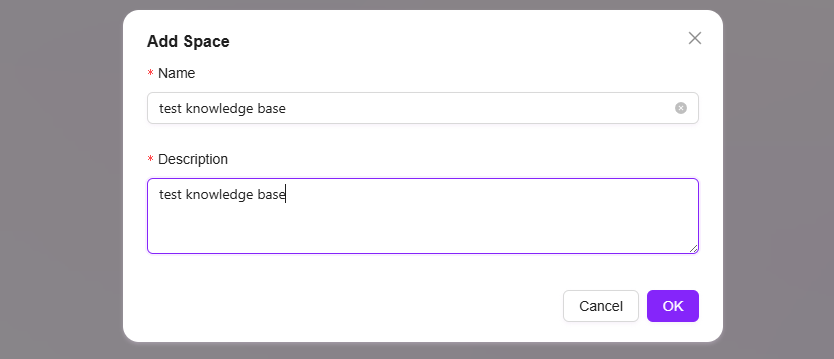
- First, navigate to the My Space Overview page and click "New Knowledge Base".
- Fill in the name and description of the knowledge base, click "OK" to successfully create a knowledge base in your personal space (the example in the image is "Test Knowledge Base").
Creating a Knowledge Base in Enterprise Space
💡 Tip: Creating a knowledge base in Enterprise Space requires the relevant permissions. Please ensure you have creation permissions before proceeding.
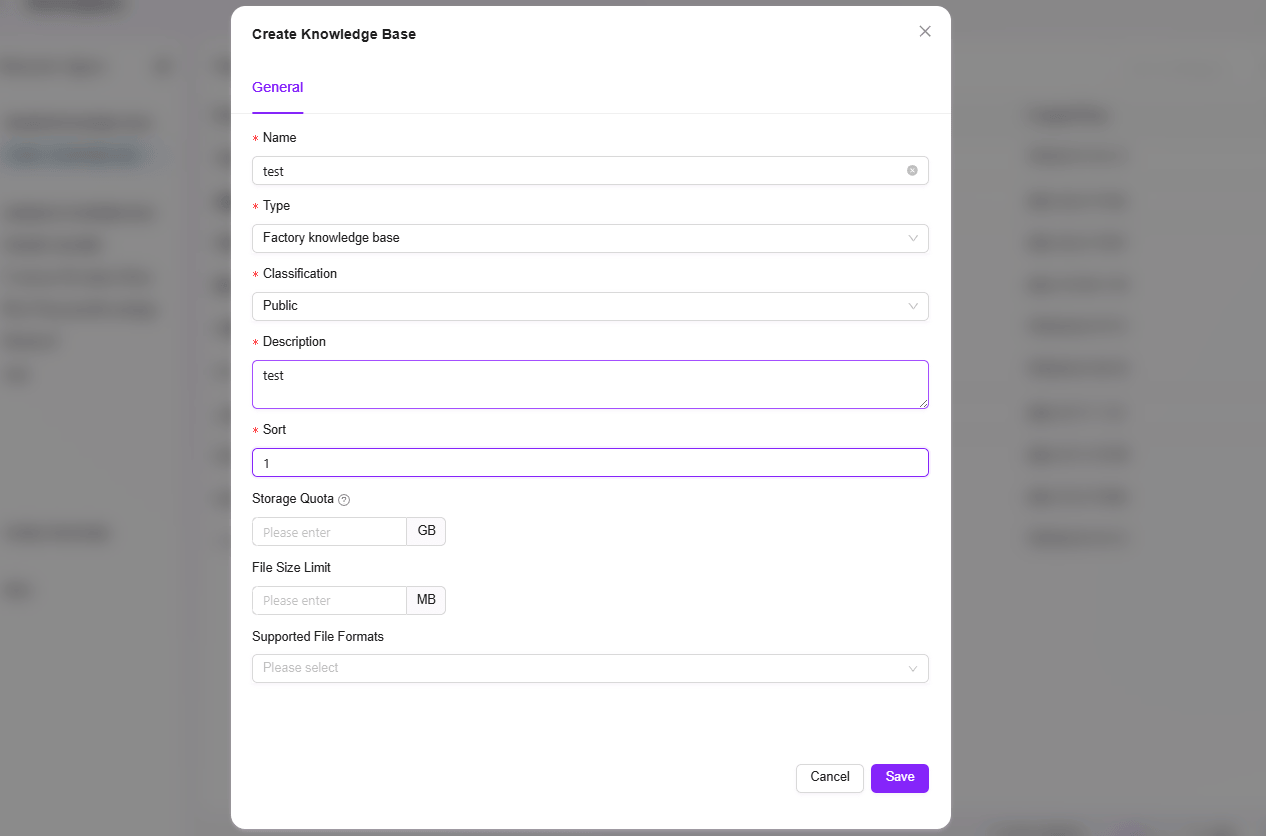
Steps to create a knowledge base in Enterprise Space:
-
First, navigate to "Settings -> Knowledge Management -> Enterprise Space", and enter the enterprise space where you want to create the knowledge base.
-
Click "Add" on the right side of the knowledge base.
-
In the pop-up create knowledge base page, enter the name, security level, description, and other information, then click "OK" to create successfully.
- Security Level: There are two default levels, public and Highly confidential.
- Storage Quota: 0-1GB
- File Size Limit: Supports custom upload file size for the knowledge base.
- Supported File Formats: Supports custom file formats for the knowledge base.
💡 Tip: After customizing the upload file size and file format, if the uploaded file does not meet the restrictions, the system will prompt accordingly.

How to Configure Knowledge Base Space Settings?
💡 Tip: Configuring knowledge base space settings requires enterprise space management permissions. Please ensure you have this permission before modifying knowledge base settings.
Knowledge Base Space Settings can be accessed from multiple entry points:
- On the knowledge base overview page in enterprise space, click "✏️" on the knowledge base card to open.
- After entering the knowledge base, click the Knowledge Base Settings button in the upper right corner to open.
- "Settings -> Knowledge Management -> Enterprise Space", select the knowledge base to edit, click "···" on the right, and select "Settings" to open.
General Settings
General settings for the knowledge base include the information filled in when creating the knowledge base, such as name, type, security level, description, storage quota, file size limit, supported file formats.
File Settings
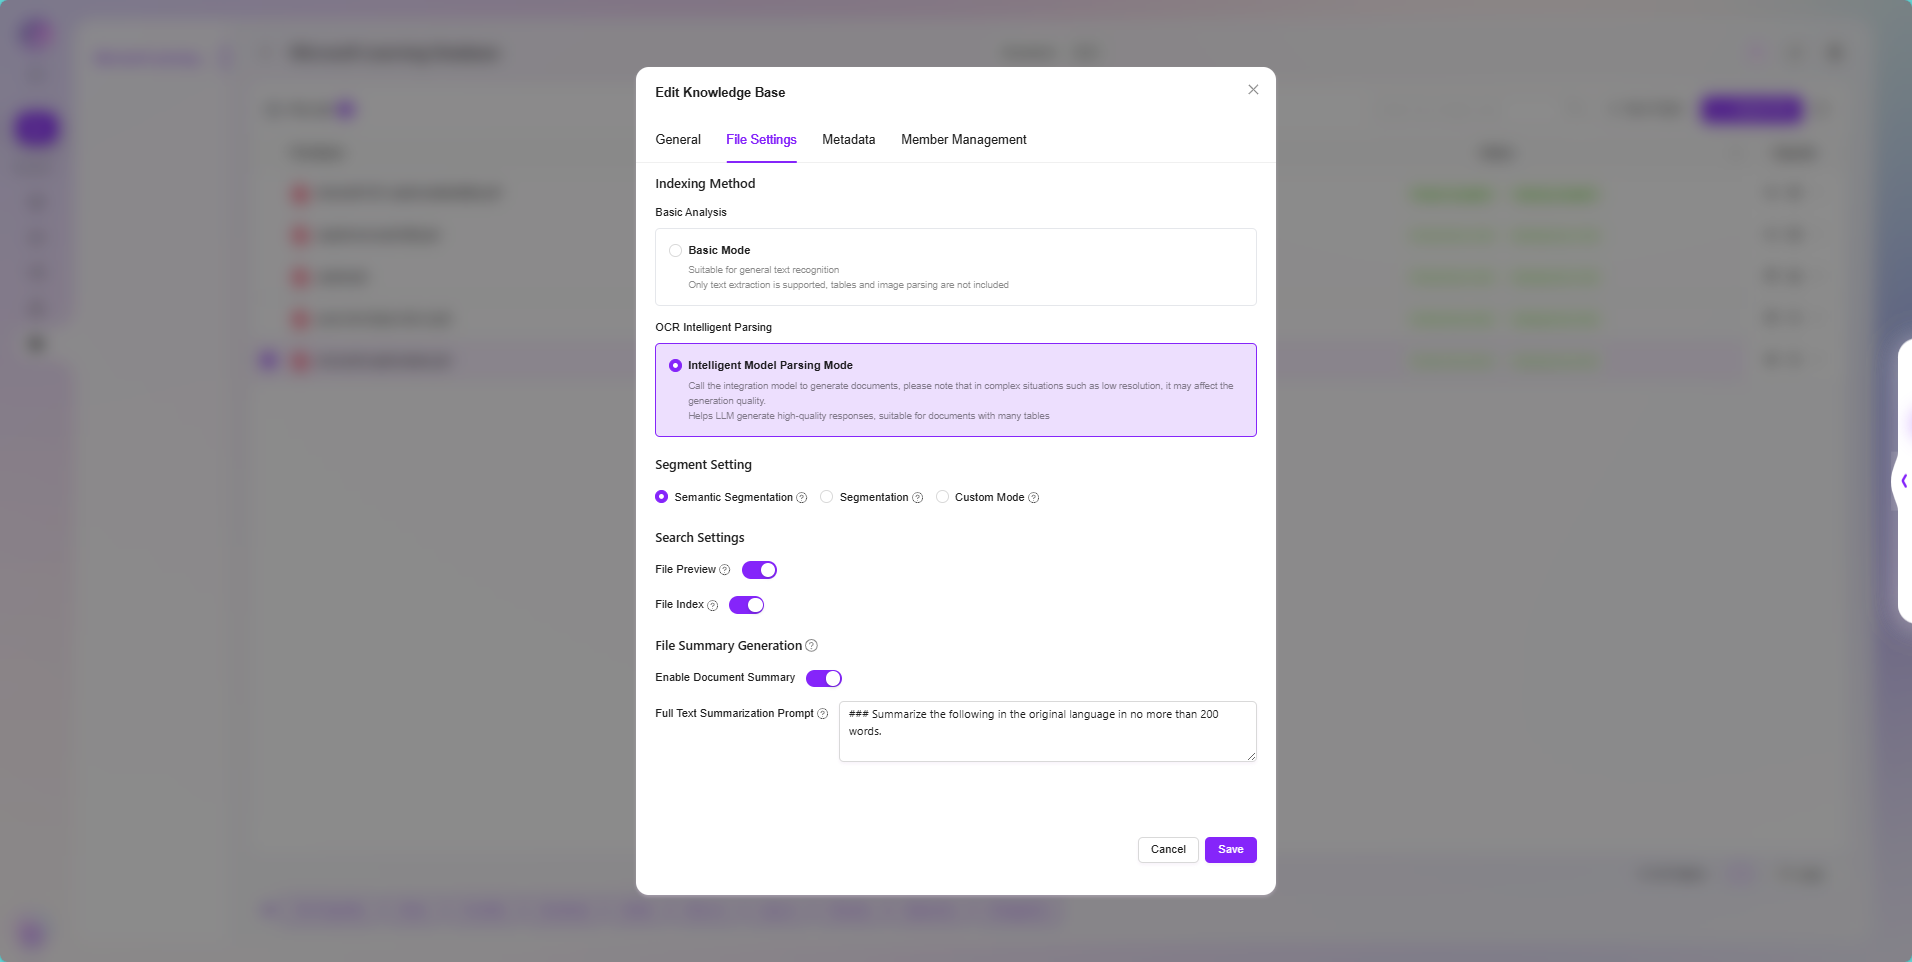
Indexing Method:
- Basic Parsing: Suitable for general text recognition. Choose basic parsing when files do not contain tables or images.
- OCR Intelligent Parsing: Calls integrated models to process documents, suitable for documents containing a large number of tables.
Segment Setting:
- Semantic Segmentation: Uses large models for semantic segmentation to improve accuracy, but consumes more tokens.
- Segmentation: Text is first split by a maximum of 1024 characters, then each segment is further split by 200 characters. Each small segment has an independent index.
- Custom Mode: Users can customize the maximum number of characters per segment. For example, set to 500, then every 500 characters is split into one segment.
Search Settings:
- File Preview: Controls whether files (documents, images, videos, audio) in the knowledge base support online preview.
- File Indexing: Sets whether various resources (documents, images, videos, audio) in the knowledge base are included in the global search index. If disabled, the corresponding resources cannot be retrieved by keywords.
File Summary Generation: Automatically generates content summaries for documents in the knowledge base for quick browsing of core information. If disabled, newly uploaded documents will no longer automatically generate summaries.
Metadata
Metadata is data that describes data, such as size, name, location of a file. In SERVICEME, metadata is used to enhance file management and knowledge base retrieval capabilities.
The Role of Metadata in SERVICEME
File-level Metadata:
- When uploading files, the system automatically saves basic metadata such as file size, name, storage location, etc.
- Users can customize metadata, such as tags, categories, uploader, etc., for more precise file management.
- When retrieving knowledge base files, you can filter based on metadata to improve search hit rate.
Knowledge Base-level Metadata:
- The knowledge base itself can also be configured with metadata, such as topic, industry category, permission information, etc.
- Through knowledge base metadata, more advanced classification and retrieval can be achieved, improving knowledge management efficiency.
Member Management
Owner: The knowledge base owner has all permissions for the knowledge base, including management, editing, and access.
Editor: Knowledge base editors have the right to perform all file operations, such as uploading and deleting files.
Visitor: Visitors can only view the knowledge base content and cannot make any modifications.

- You can manage member permissions through roles, but only administrators can access the role permissions page.
- For detailed operations on managing member permissions through roles, see below "How to Manage Knowledge Base Member Permissions via Roles".
How to Manage Knowledge Base Member Permissions via Roles?
Before understanding how to manage knowledge base member permissions via roles, you need to understand three concepts: Role, User Authorization, Function Authorization.
- Role: Roles are created by administrators and can be created for different scenarios.
- User Authorization: After a role is created, users can be added to this role, which can also be understood as assigning a role to a user.
- Function Authorization: Function authorization for a role refers to what functions this role can have.
💡 Tip: As can be seen above: Function Authorization + Role Authorization = Granting a specific permission to a user
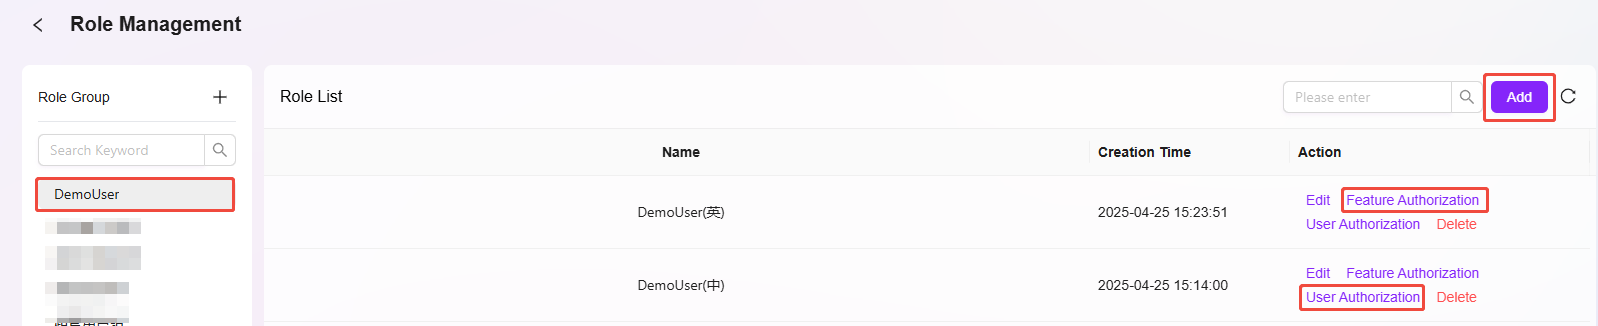
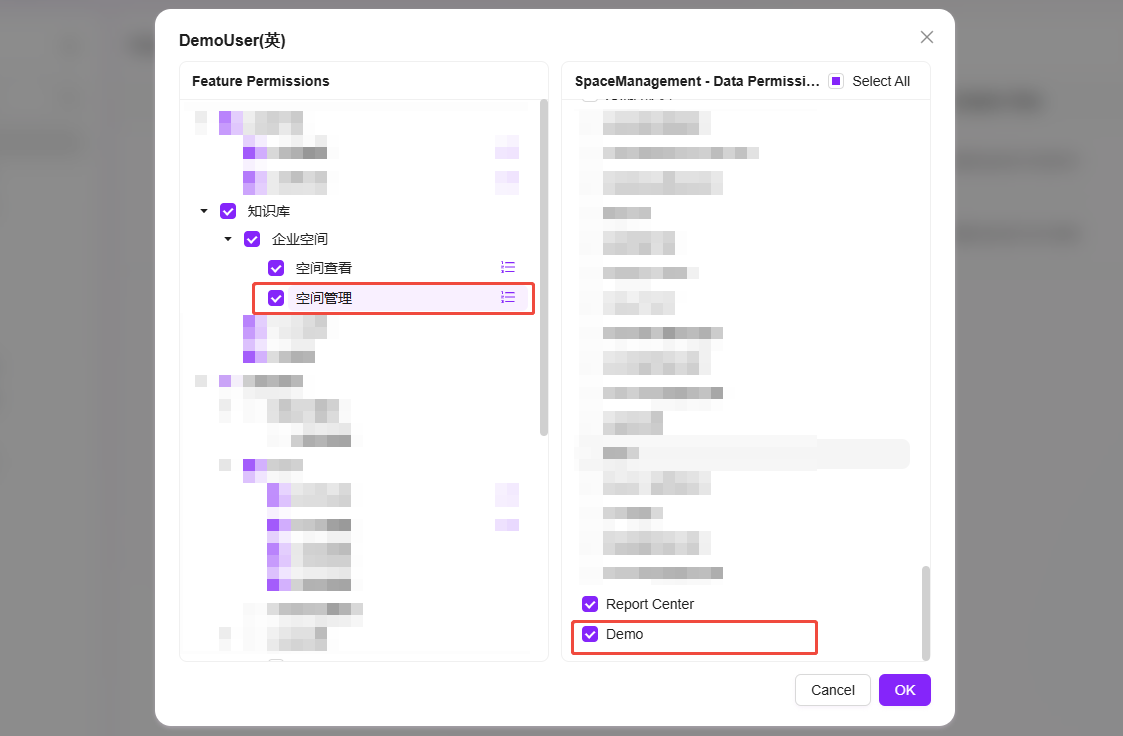
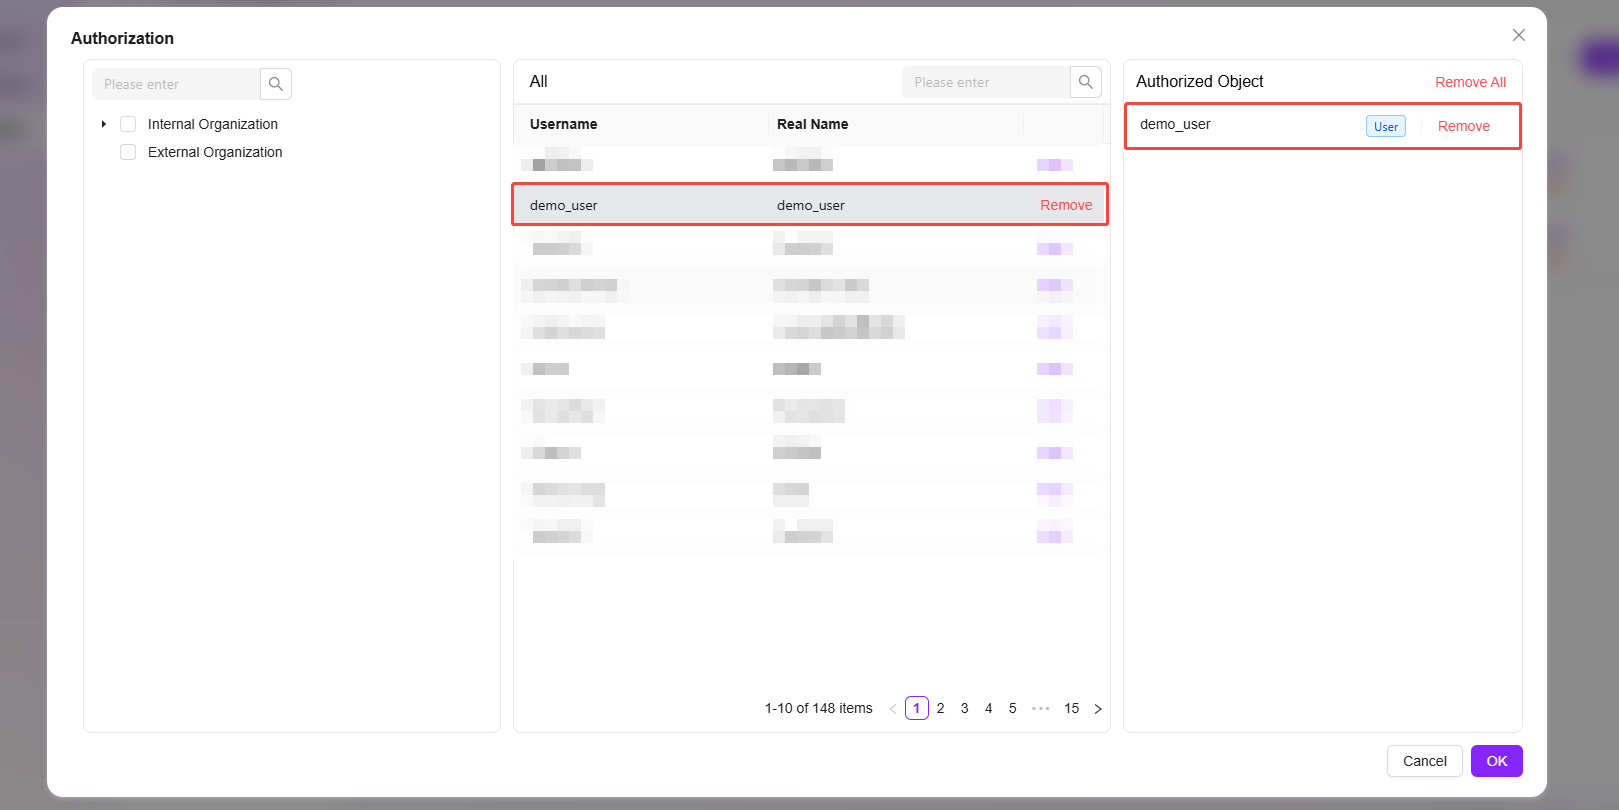
⏳ Example: Grant DemoUser the management permission for the Demo knowledge base.
- Click "Add" on the right side of the role list to create a new role named "Knowledge Base Management".
- After creating the knowledge base management role, click "Function Authorization" for the role, find "Space Management", locate and check "Demo" under the knowledge base in space management, then click "OK".
- Next, add the test account to this role. Click "User Authorization" for the corresponding role, find and check DemoUser according to the test account's organization, then click "OK".
- After the above operations, DemoUser will be successfully granted management permission for the Demo knowledge base.
How to Delete Enterprise Spaces and Knowledge Bases?
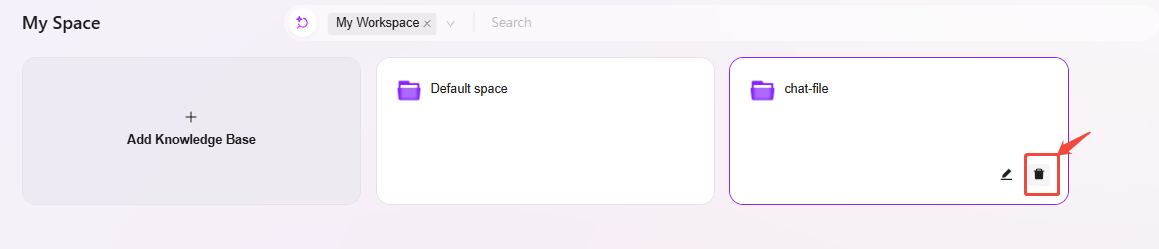
Delete Knowledge Base
To delete a knowledge base, simply navigate to the knowledge base overview page, find the corresponding knowledge base card, and click the "🗑️" at the bottom right of the card to delete the knowledge base. The deletion method is the same for both My Space and Enterprise Space.
As shown below:
Delete Enterprise Space
To delete an enterprise space, a user with space management permissions should navigate to "Settings -> Knowledge Management -> Enterprise Space", click the "⚙️" next to the enterprise space, select the enterprise space to delete in the pop-up page, click "Delete" in the upper right corner, and confirm again to delete.
As shown below:

Comparison of File Operations in My Space and Enterprise Space
| My Space | Enterprise Space | |
|---|---|---|
| Download | ✅ | ✅ |
| Favorite | ✅ | ✅ |
| Delete | ✅ | ✅ |
| Rename | ✅ | ✅ |
| Re-preview | ✅ | ✅ |
| Re-segment | ✅ | ✅ |
| File Properties | ✅ | ✅ |
| Share | ❌ | ✅ |
| Move to | ❌ | ✅ |
| Copy to | ❌ | ✅ |
| Add Shortcut | ❌ | ✅ |
| Tag | ❌ | ✅ |
| Metadata Properties | ❌ | ✅ |
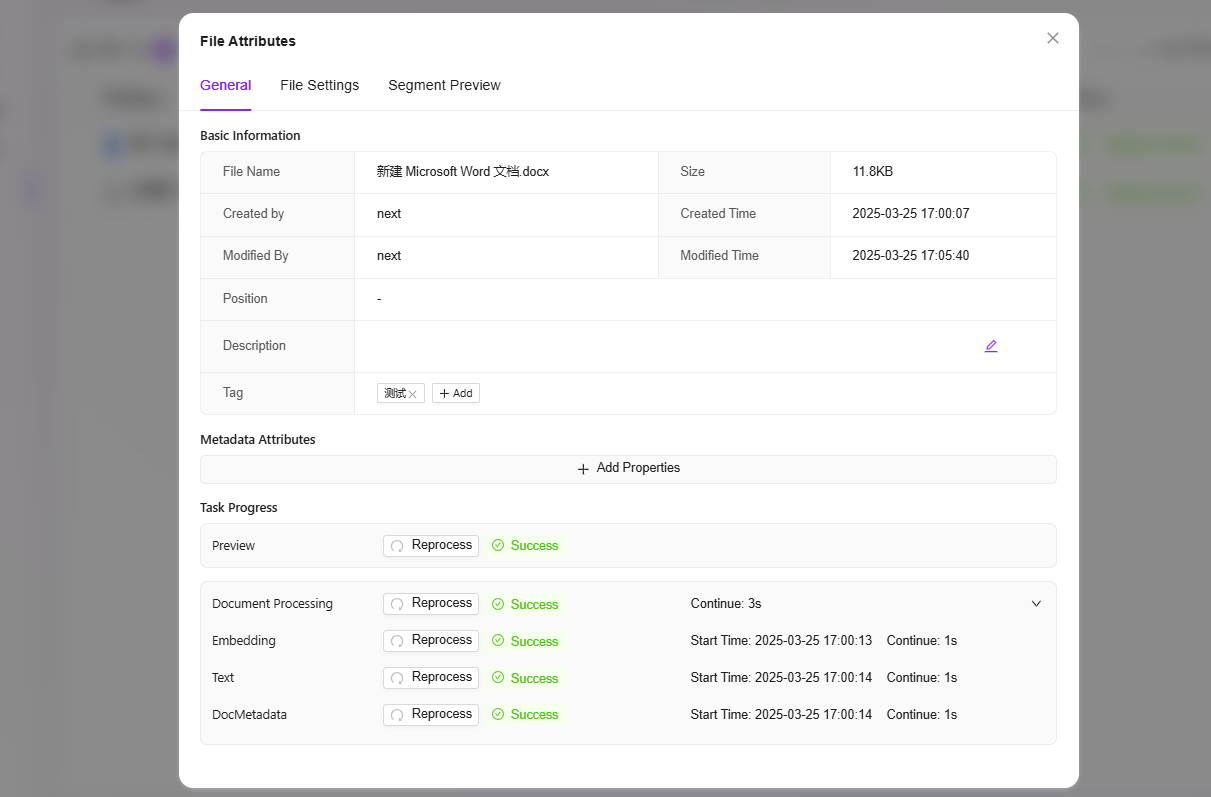
About File Properties
File properties are settings for individual files, while the knowledge base space settings mentioned earlier are for the knowledge base as a whole. File settings in knowledge base space settings can be inherited by file properties.
General Settings
- Basic Information: Basic information in file properties includes file name, size, creator, creation time, modifier, modification time, location, description, tags.
💡 Tip: Only files in Enterprise Space support the use of tags and can add new tags; files in Personal Space do not support the tag function.
-
Metadata Properties: Supports adding new metadata. Click "Add" to add a new metadata field.
-
Task Progress:
- Preview: Supports file preview and allows you to view the progress of file preview. If loading fails, click the Retry button to reload.
- File Processing: File processing includes multiple steps. Click "File Processing" to view the current processing progress and step.
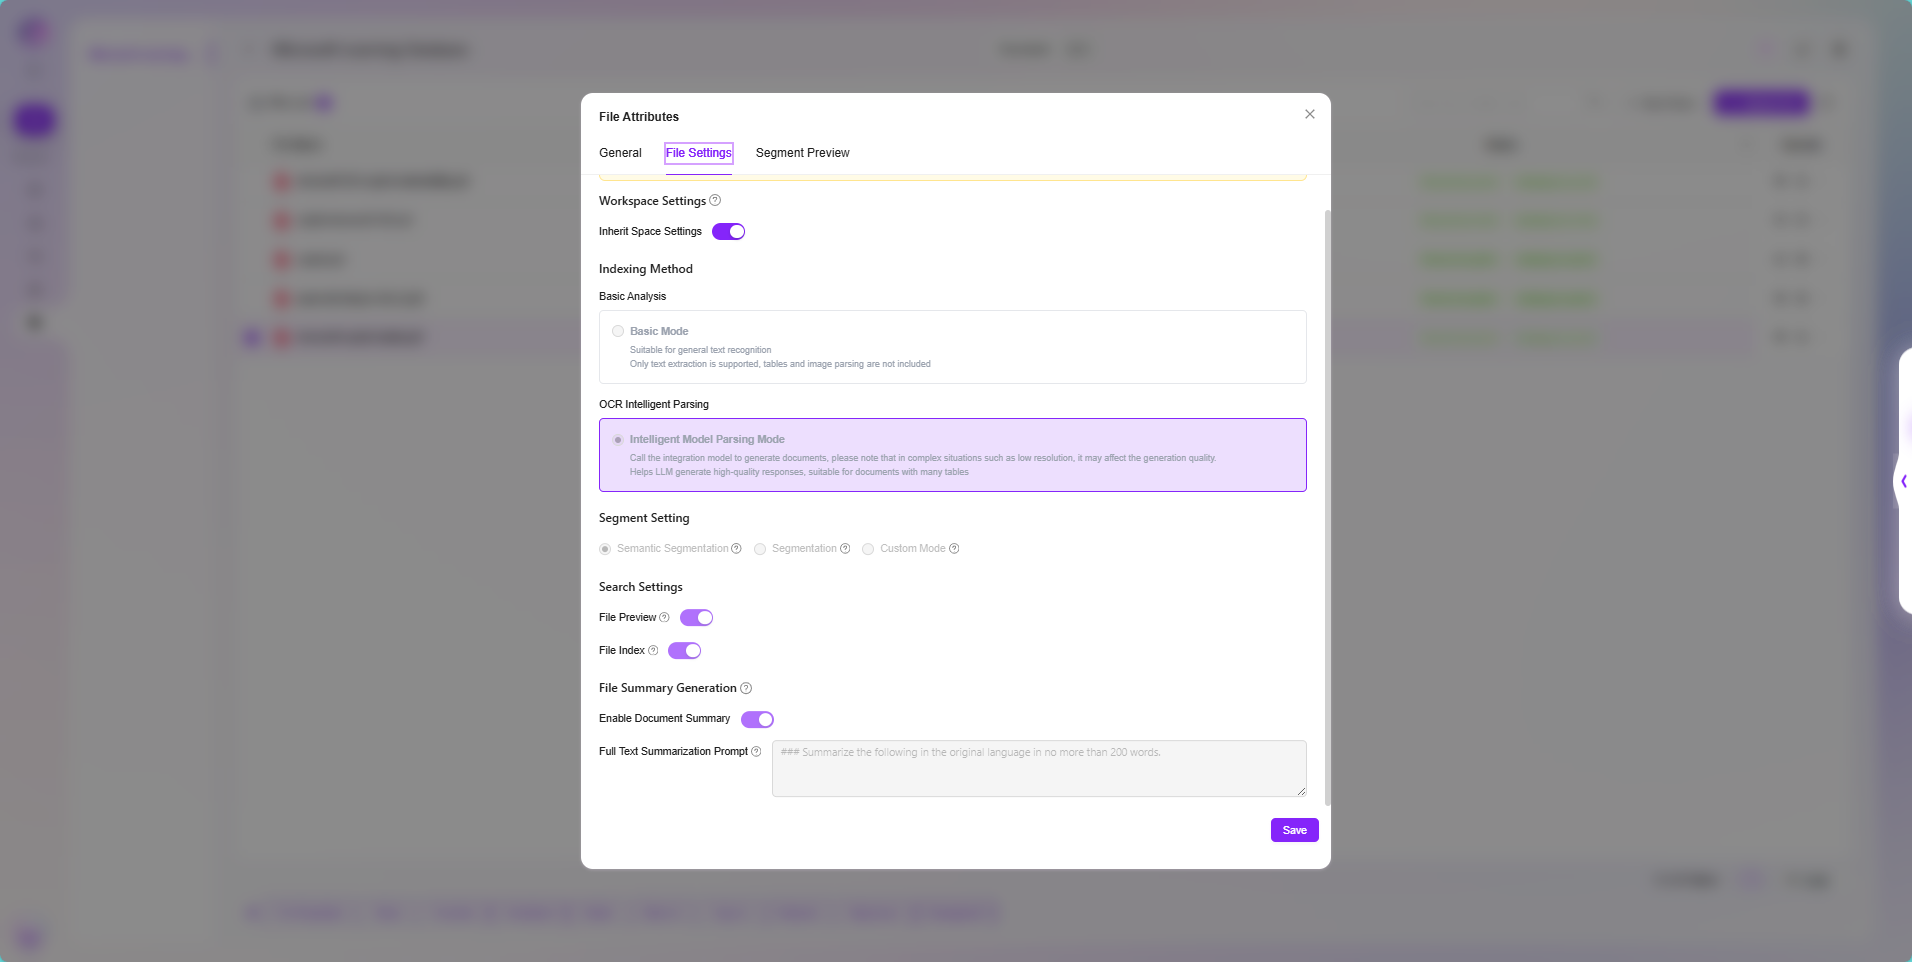
File Settings
-
Space Settings: File settings inherit space settings by default, no extra configuration needed. If the file requires custom settings, turn off the "Inherit Space Settings" button.
-
Indexing Method: Basic Parsing, OCR Intelligent Parsing
-
Segmentation Settings: Default, Fine, Custom
-
Retrieval Settings: File Preview, File Indexing
-
File Summary Generation: Enable summary, full-text summary prompt
💡 Tip: For detailed file settings, refer to "How to Configure Knowledge Base Space Settings".
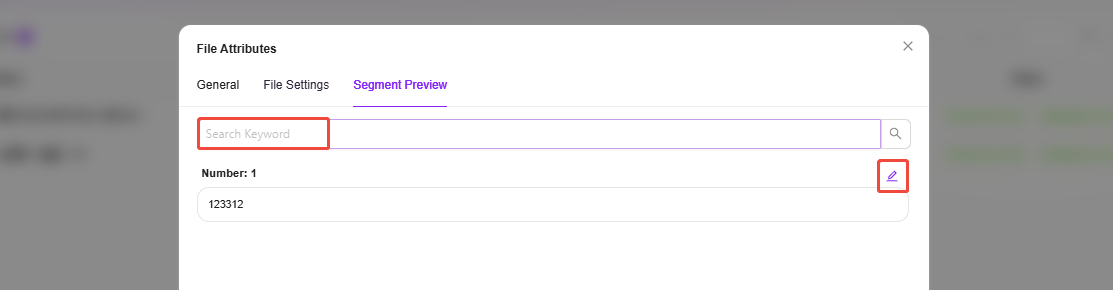
Segment Preview
-
Segment Preview supports viewing the segmentation of the file. Each segment has a serial number and supports editing the segment content.
- Editing segment content does not affect the original file; it only modifies the content used for indexing and preview.
-
In the segment preview interface, you can search keywords to quickly locate the segment containing the keyword, improving search efficiency.
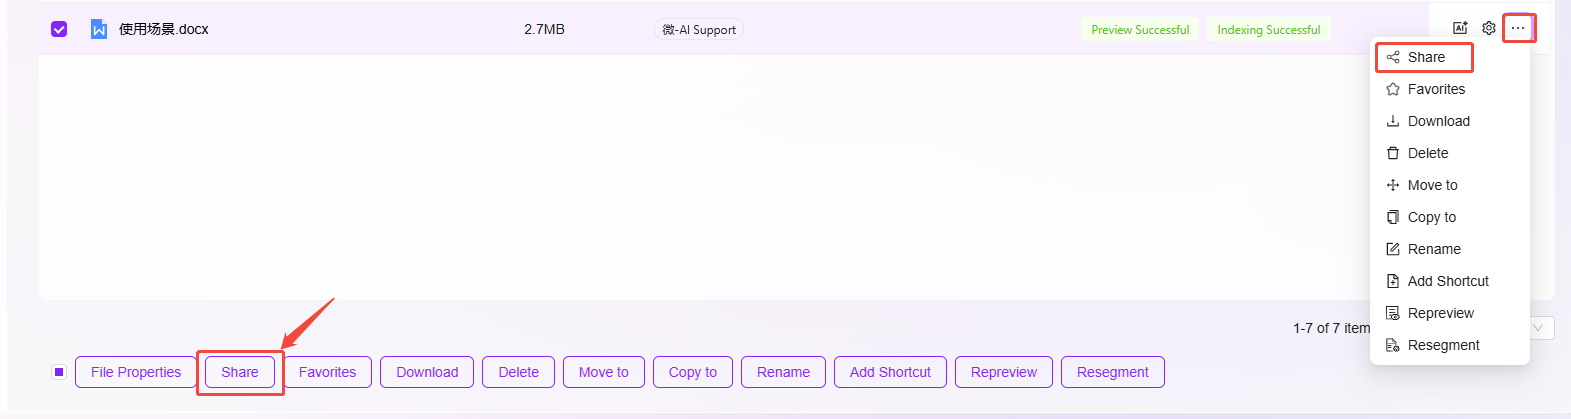
How to Share Files?
Currently, only files in Enterprise Space can be shared. The sharing steps are as follows:
- Select the file you want to share, such as "Usage Scenarios".
- Click "Share" at the bottom of the page or click "···" on the right.
- Select "Share", and choose the appropriate sharing settings on the sharing page.
- Click "OK" to complete.
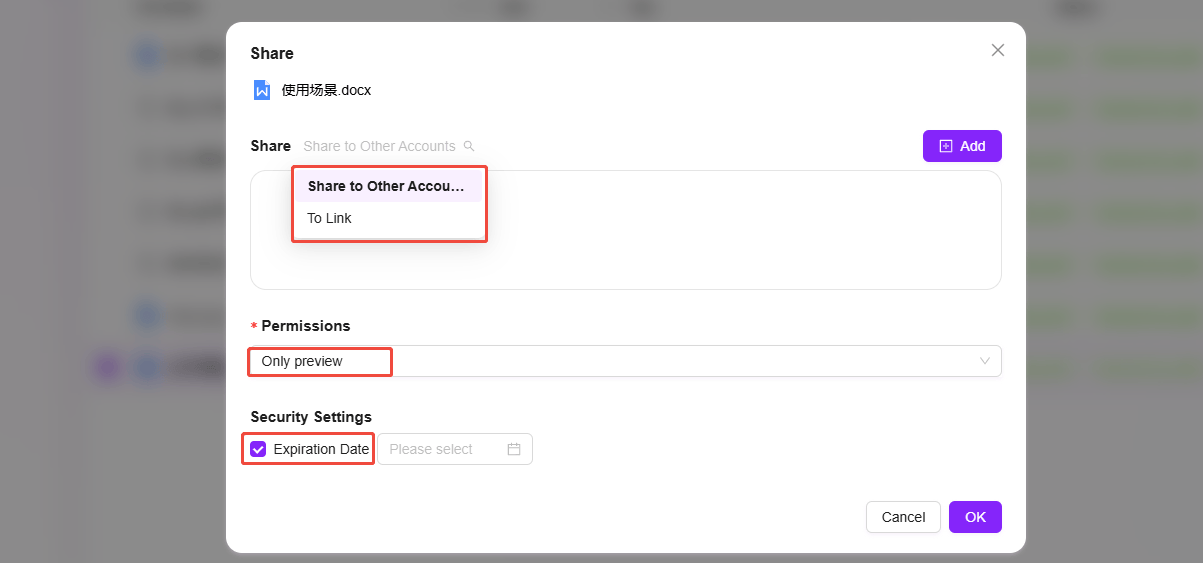
On the sharing page, select sharing method, permissions, and security settings:
-
Sharing Method:
- Share to Account: Share the file with specified personnel.
- Share as Link: Share the file as a link. Anyone with the link can view the file (you can optionally set a password for the link).
-
Permissions:
- Preview Only: Can only view the file, cannot download.
- Preview and Download: Can view and download the file.
-
Security Settings:
- Never Expires: If "Expiration Time" is not checked, the file share will never expire by default.
- Expiration Time: Check "Expiration Time" and select the expiration date.
💡 Tip: Shared files can be viewed in "Knowledge - Share - Shared by Me".
File Operations
Create Folder & Upload File
Create Folder: Both My Space and Enterprise Space support folder creation. On the knowledge base page, click "New Folder" on the right, enter the folder name, and click "OK".

Upload File: To upload files in My Space and Enterprise Space, click "Upload File" in the upper right corner of the page, select the file to upload, click "Open", and wait for indexing to succeed before using the file.
- There are four file upload statuses: Waiting for Indexing, Indexing, Indexing Successful, Indexing Failed
- Only files with indexing successful status can be previewed and used normally.
- You need edit permissions in Enterprise Space to create folders or upload files. Please ensure you have the relevant permissions before operating.

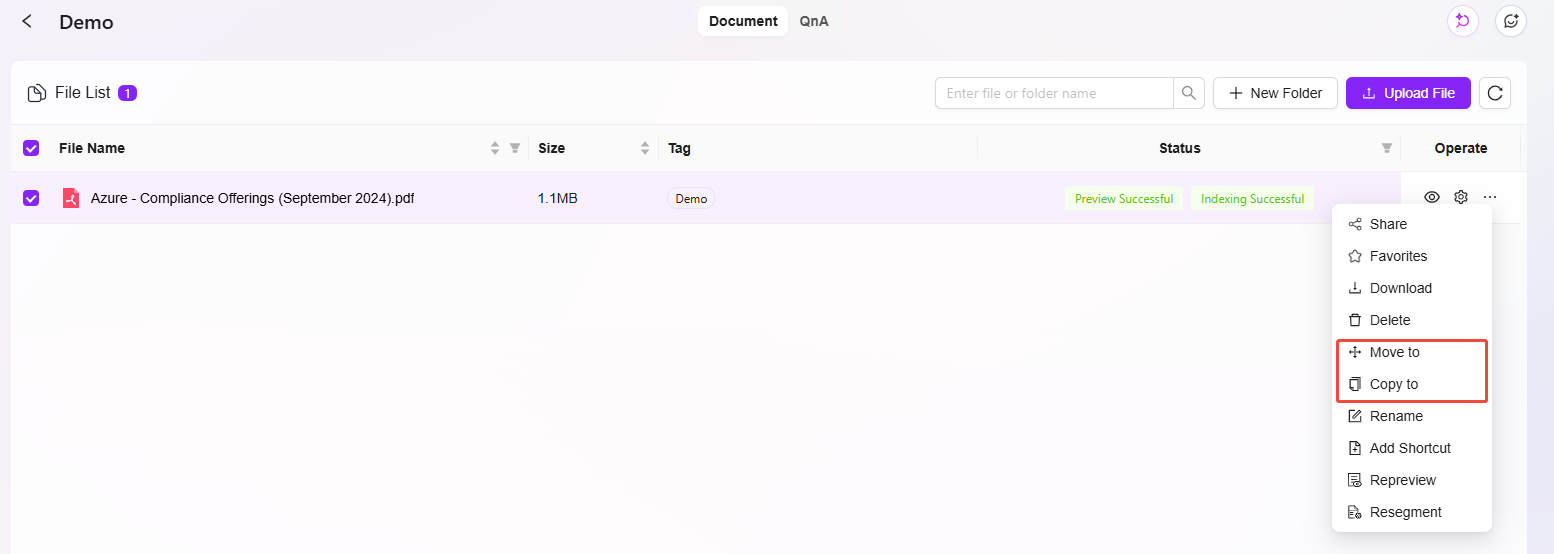
Move & Copy Files
Move/Copy Files: Select the file to move or copy, click "···" on the right, choose "Move to"/"Copy to", select the target location, and click "OK".
- Files in My Space do not support move and copy; only files in Enterprise Space support these operations.
- Moreover, files in Enterprise Space can only be moved or copied within the same knowledge base.
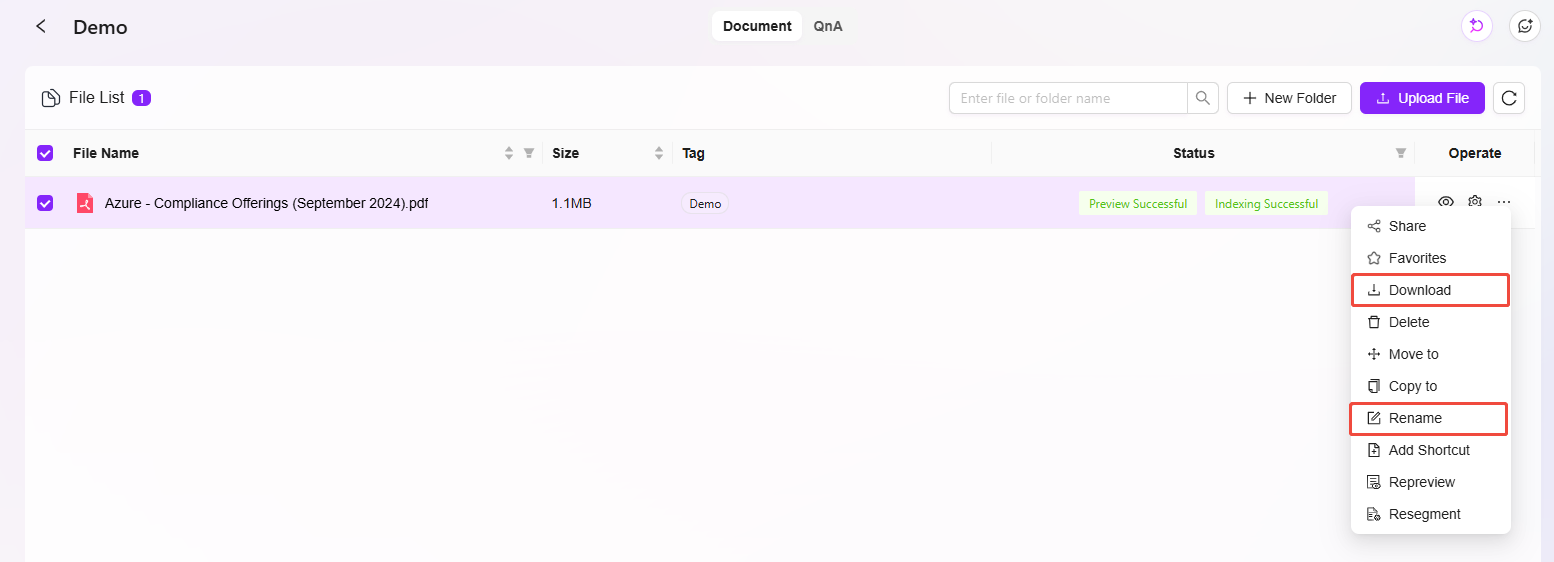
Download & Rename Files
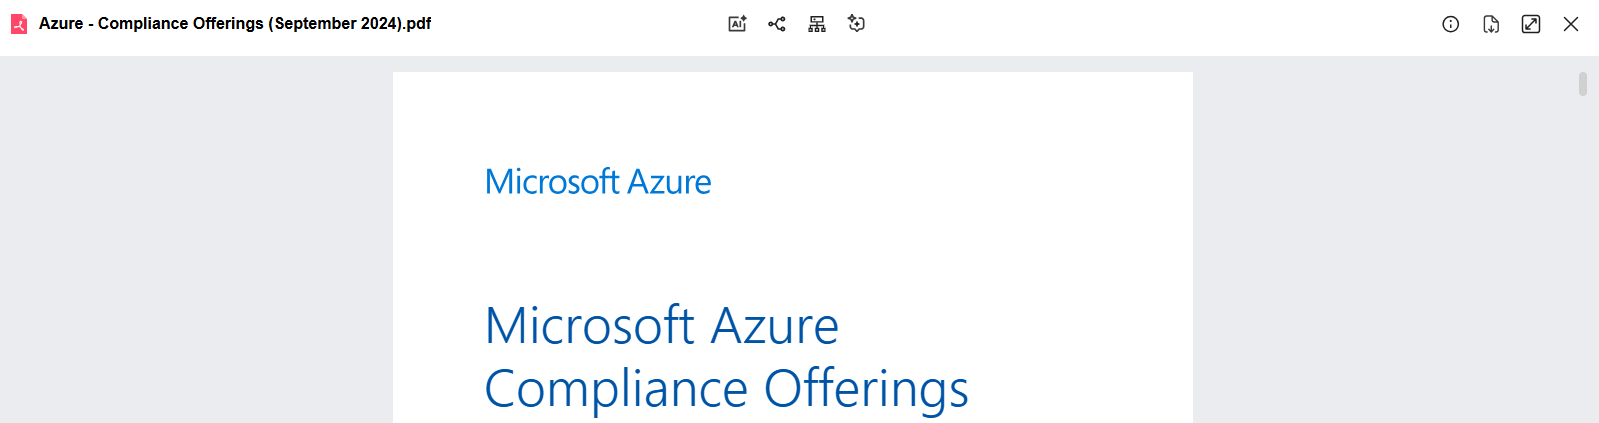
- Example of download & rename:
- Select the "Azure - Compliance Offerings (September 2024).pdf" file.
- Click "···" on the right or "Download"/"Rename" at the bottom of the page.
- Click "Download" to complete the download. Click "Rename", enter the new file name, and click "OK".
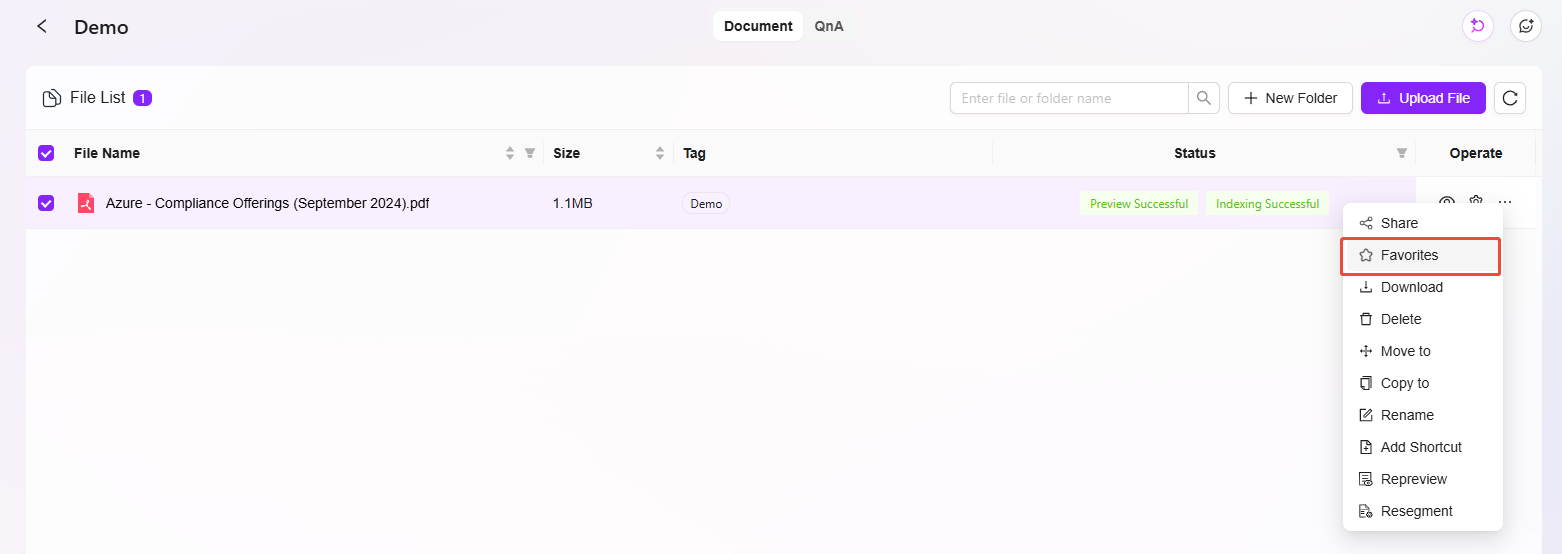
Favorite Files
- Example of favoriting files:
- Select the file to favorite.
- Click "···" on the right.
- Choose "Favorite". After successful favoriting, a prompt "Successfully added to favorites list" will appear at the top of the page.
- After favoriting, you can unfavorite files in the favorites list.
💡 Tip: Both My Space and Enterprise Space support favoriting files. Favorited files can be viewed in "Knowledge -> Favorites".
Favorite File Operation:
Favorite File List:

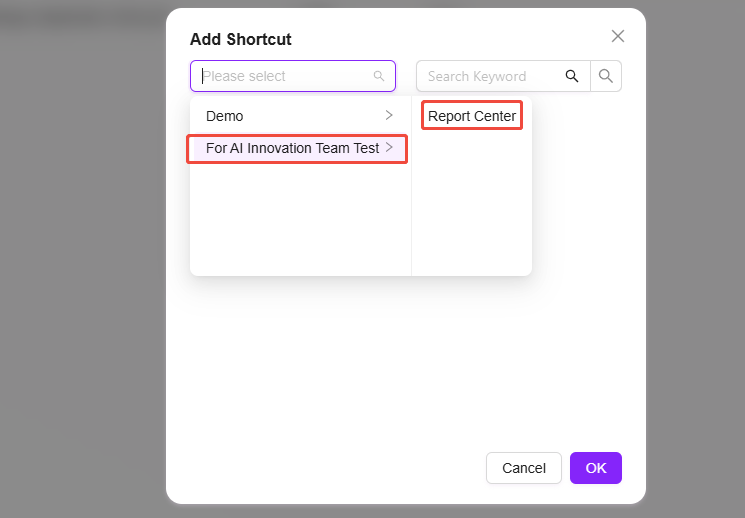
Add Shortcut
When adding a shortcut, you can add it to any enterprise space by selecting the corresponding enterprise space and knowledge base.
- Example of adding a shortcut:
- Select the file to add a shortcut for.
- Click "···" on the right.
- Choose "Add Shortcut".
- Select the location for the shortcut.
- Click "OK" to successfully create a shortcut for the "Security Technology Open Course" file.

Preview Files
After a file is uploaded and indexed successfully, there will be a preview process. When the status is Preview Successful, you can view the preview.
At the top of the preview page, you can view the file's summary, mind map, outline, and conversation. (AI summary)
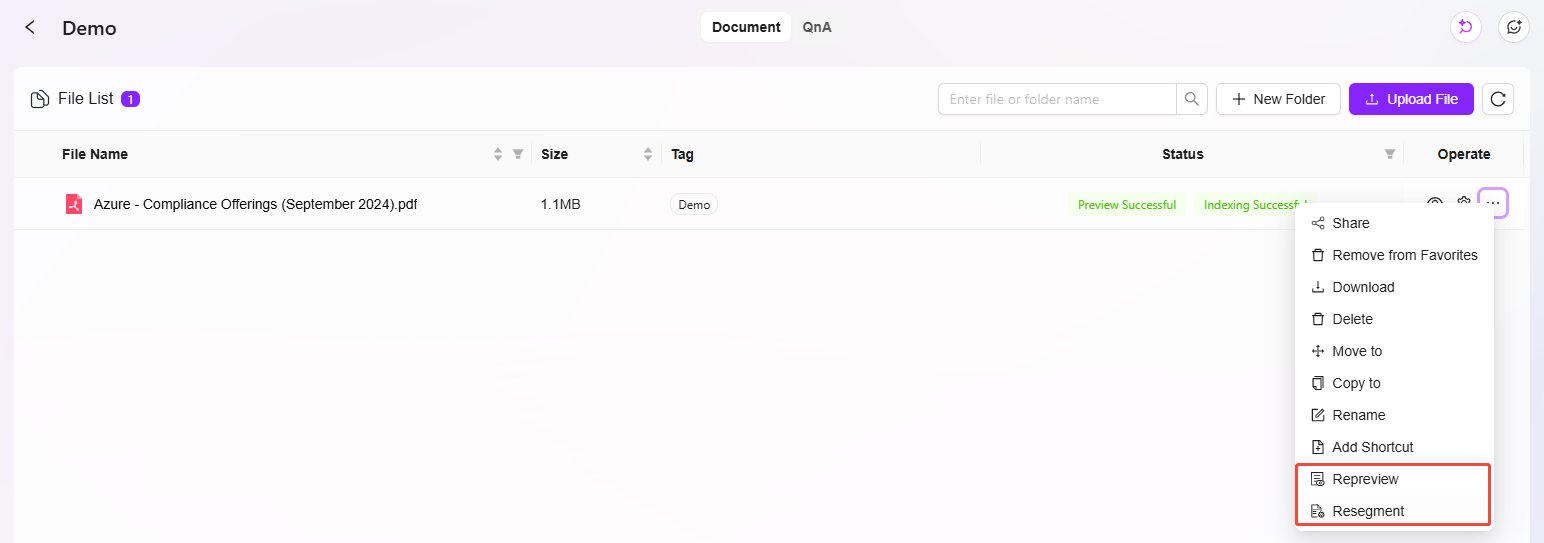
Re-preview & Re-segment
After selecting a file, the "Re-preview" and "Re-segment" buttons will appear.
-
Re-preview can refresh the file display to ensure the content is presented as expected.
-
Re-segment is used to adjust the file structure, making paragraph or segment division more reasonable and optimizing content organization logic.
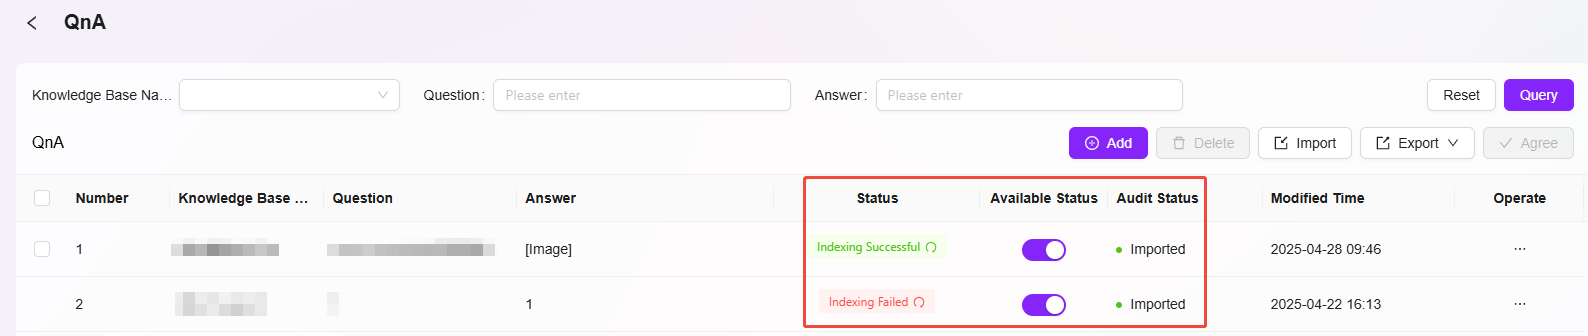
What is QnA?
Enterprise Space has a QnA feature. When the assistant retrieves a question from QnA, it will directly provide the preset answer instead of relying on online Q&A. This effectively avoids inaccurate or inconsistent answers caused by complex online information, ensuring that replies are precisely aligned with enterprise needs and standards.
QnA supports multi-dimensional retrieval based on enterprise space, question, answer, etc., enabling quick location of required information, greatly improving information search efficiency, and helping employees quickly access accurate knowledge to accelerate business processes.
QnA Related Operations
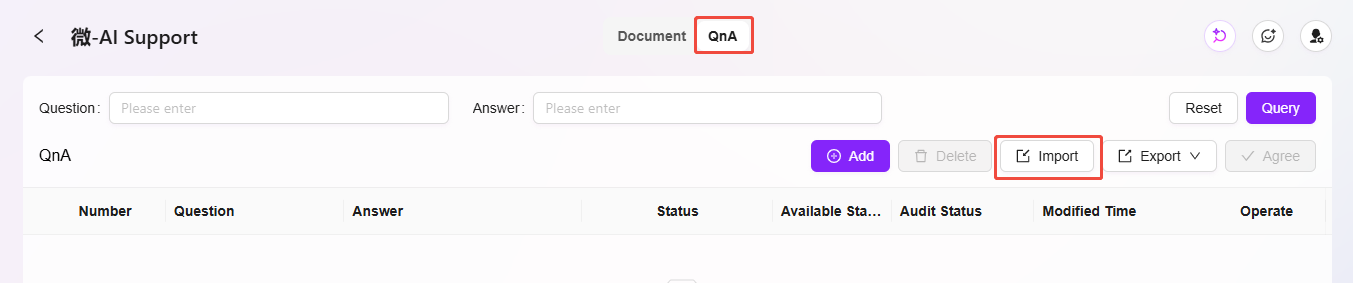
Import QnA
There are two ways to upload QnA, one of which is Import QnA. Importing QnA supports batch import and is suitable when there are many QnAs.
Steps to import QnA:
-
Enter the enterprise space knowledge base and open the QnA interface.
-
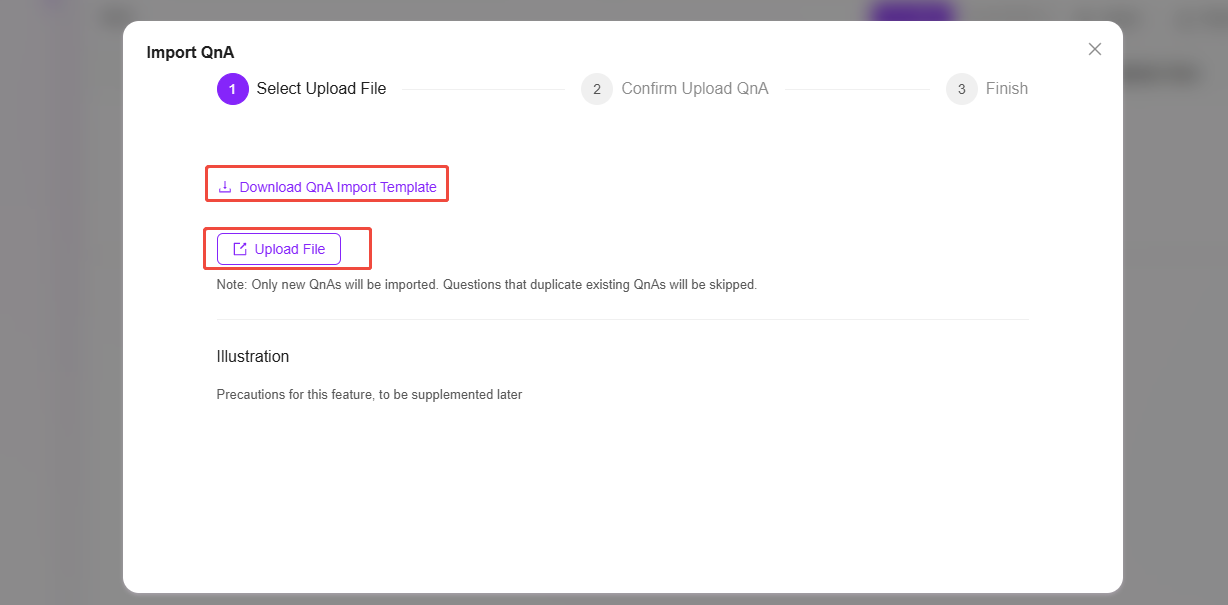
Click the "Import" button on the right to open the import page.
-
You can choose "Download Template File", fill in the template file, and you need to fill in Enterprise Space, Question, Answer (Enterprise Space refers to the knowledge base name under the enterprise space).
-
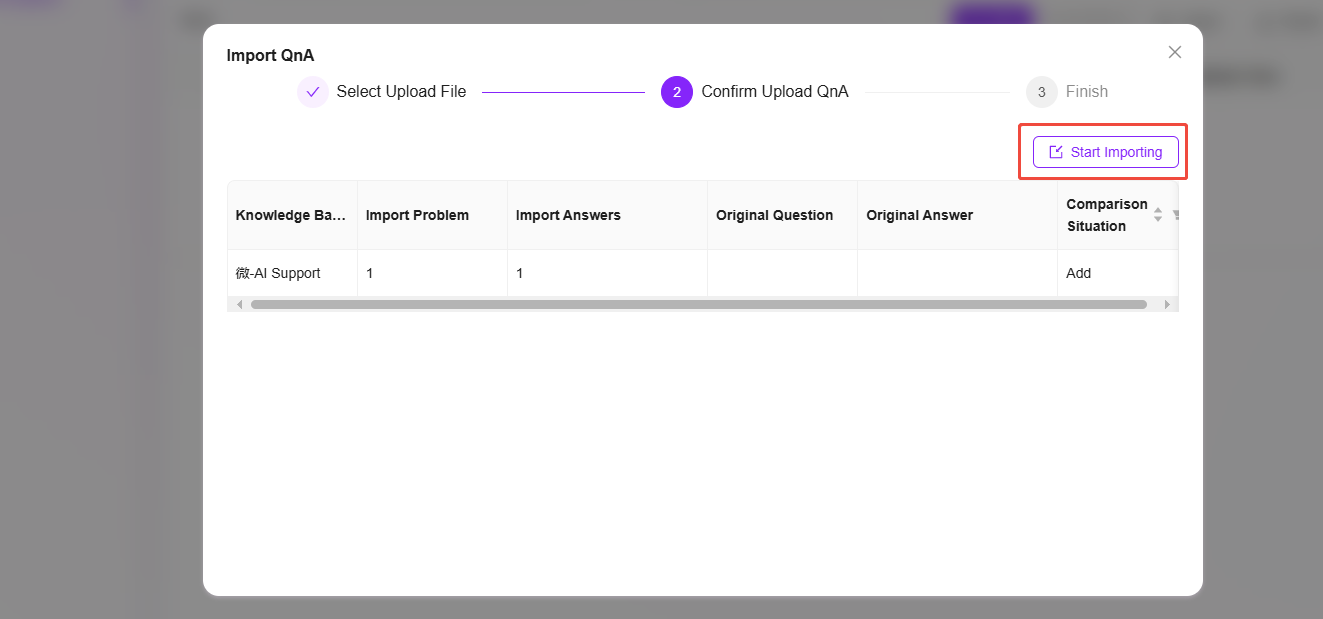
After completing the template file, repeat the above steps to enter the import page, click "Upload File", and select the completed template file.
-
The file information will be previewed automatically. After confirming it is correct, click "Start Import" on the right.
-
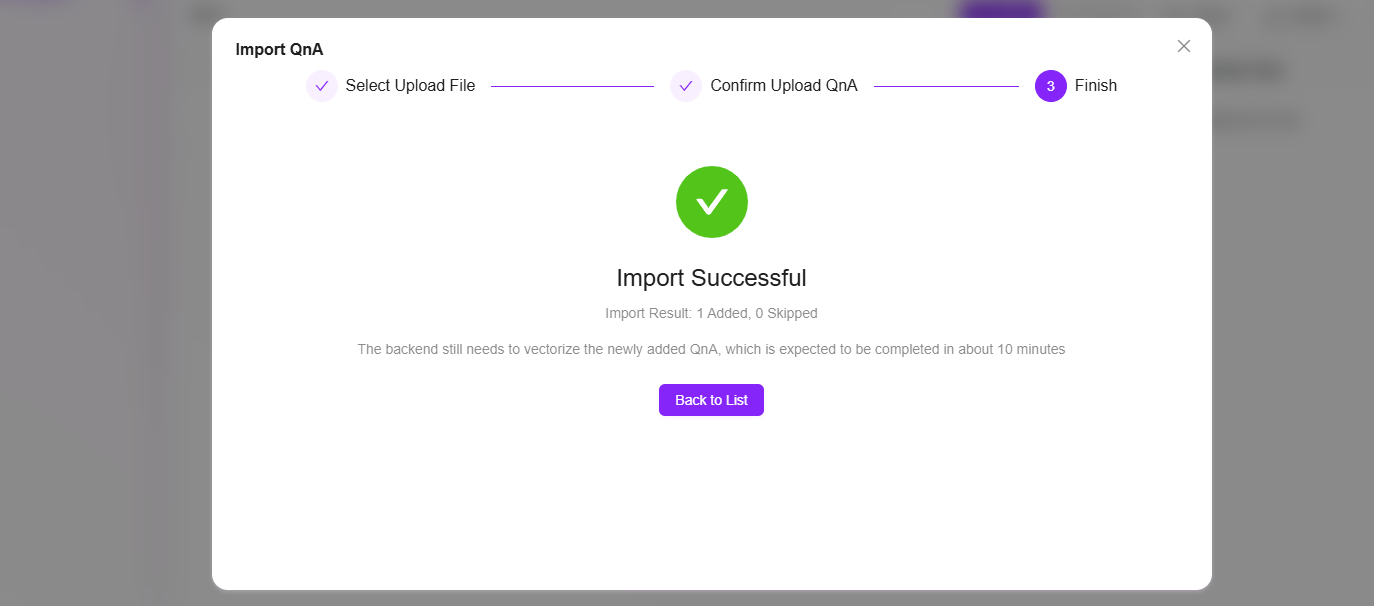
Wait for the process to complete and display Import Successful.
💡 Tip: Only new QnAs will be imported. Questions that duplicate existing QnAs will be skipped.

Add QnA
There are two ways to upload QnA, the other is Add QnA, which allows you to add only one entry at a time.
Steps to add QnA:
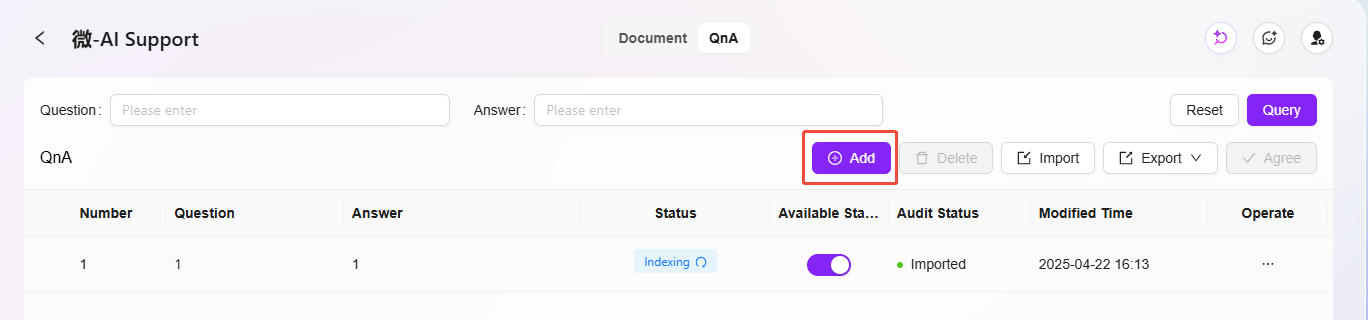
-
Enter the enterprise space knowledge base and open the QnA interface.
-
Click the "Add" button on the right to enter the add interface. The left side is the question interface, and the right side is the answer interface.
-
On the question side, select the knowledge base name where the QnA is located.
-
Click the "Add" button to add multiple questions.
-
On the answer side, enter the answer. The answer supports text, links, images, videos, etc.
-
After entering the answer and questions, click "Save" to successfully add the QnA.
💡 Tip: When adding multiple questions, all these questions will share the same answer, which is the answer entered on the right.
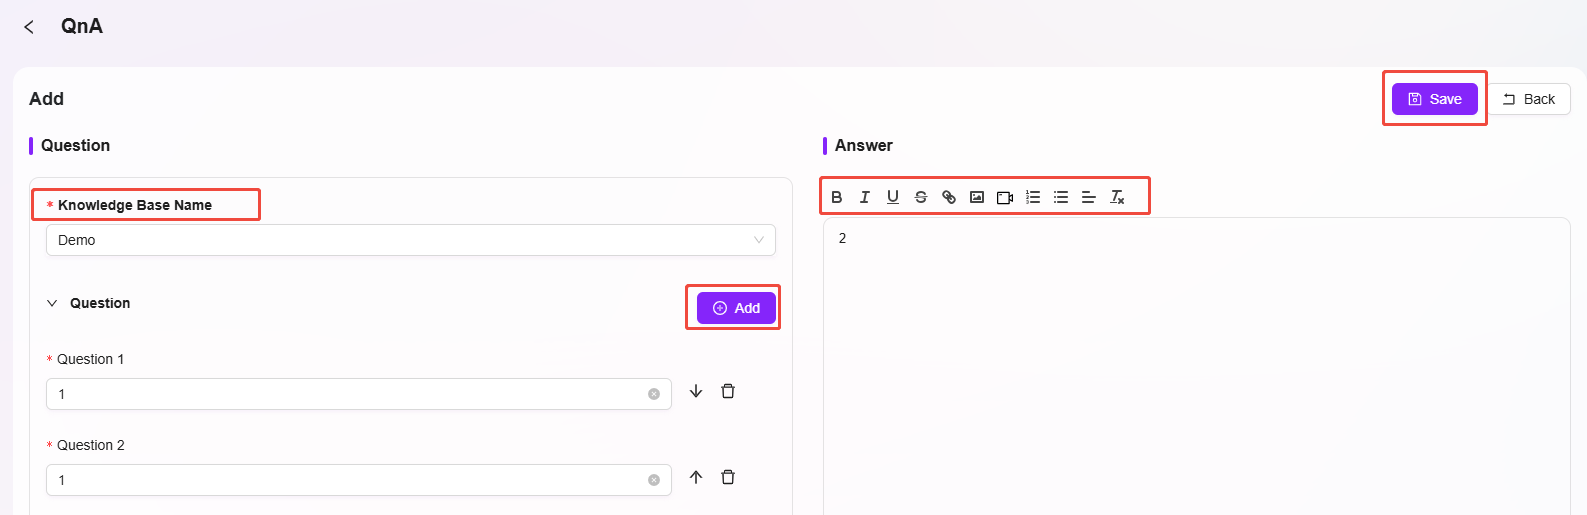
- "Answer" includes rich text style tags. It is recommended to limit the total to within 2000 characters, which will help AI responses.
- To insert a video, use embedded code, such as
<iframe src="//player.bilibili.com/player.html?aid=535563667&bvid=BV1jM411S74q&cid=1322473540&p=1" scrolling="no" border="0" frameborder="no" framespacing="0" allowfullscreen="true"> </iframe>.
Review QnA
The QnA approval process ensures the accuracy and standardization of knowledge base content. This process mainly targets questions and answers submitted by non-administrators, ensuring that content is reviewed by administrators before entering the QnA library for regular users to view. Content submitted by administrators does not require review and takes effect immediately. All pending questions will automatically be listed at the top for administrators to process first.
QnA approval statuses: Pending Review, Approved, Rejected
- Pending Review: Submitted questions and answers automatically enter the "Pending Review" status, waiting for administrator review and processing.
- Approved: After administrator approval, the question and answer enter the QnA library and can be viewed by regular users.
- Rejected: If the content does not meet standards, the administrator can choose to reject it. Rejected content will not be displayed to regular users but will be retained in the system for future review.
QnA approval operations: Approve, Reject, Batch Operations
- Approve: Administrators approve content that meets requirements, allowing it to enter the QnA library. Approved QnAs cannot be rejected again.
- Reject: For content that does not meet standards, administrators can choose to reject it.
- Batch Operations: Administrators can select multiple pending items for batch approval.

Export QnA
Currently, exporting QnA is supported. You can export the current page or export all QnA.
Steps to export QnA:
- On the QnA page, click "Export" on the right.
- Choose "Export Current Page" or "Export All".
- After exporting, check the file in your local default location.
